The need for self-erection of the balcony often arises from owners of private houses or tenants of apartments, in which the presence of such a premises is not initially provided by the construction.
With the work on the construction and finishing of the balcony, you can cope with your own. Learn the provisions of the above manual and proceed.
There are 2 main options for the construction of the balcony, namely:
If the design is attached to the second and advanced floors, it should have additional supports. Fasten the construction exclusively to the wall is prohibited - it will not stand it.
The feature of the supports most often execute columns. They fit well into the surrounding environment and advantageously complement the architecture of the house.
Before starting work, make up the project of the balcony in a specialized organization with a detailed scheme.
Balcony Balcony
If the balcony is attached to the first floor, there will be a fairly simple ribbon base. In the case of arrangement of an extension on the above-mentioned floors, build a tape-column foundation.
In general, the order of arrangement of concrete grounds remains almost the same. The following is the instruction on the construction of a tape-bit foundation. Remove from the manual of recommendations on the installation of columns, you will receive a finished instruction on the installation of a ribbon base.
First step. Follow the future foundation on the ground. Use pegs and cord for marking.
The second step. Get rid of the top layer of soil. Drop the trench of the required depth (is determined in accordance with the features of the soil on the ground) and poles for pillars.
Third step. Wheel (screw) support piles. Also, supports can be made independently of pipes, concrete pillars or other suitable materials. To ensure the additional strength of the installation before installing the poles, the bottoms can be poured by a 20-30-centimeter layer of concrete. The empty space between the walls of the holes and the pillars after their installation is also poured with a solution.
Fourth step. During the bottom of the trench, pour it off with a 10-centimeter layer of rubbank and a 15-20-centimeter sand layer. Each layer of frustration thoroughly misst.
Fifth step. Collect formwork from durable boards.
Sixth step. Place the reinforcing framework. Use the armature with a diameter of 10-14 mm. As a result, you should get a hardening grid with the size of the cells of no more than 150x150 mm.
Seventh step. Pour the concrete and give him a month for a set of strength. The formwork is recommended to dismantle after the complete pouring of the concrete.
Eighth step. Stip the frozen foundation with waterproofing material (bitumen, rubberoid).
Ninth step. Pull all the empties of the earth.
Tenth step. Poles tie over the upper edges with the help of a chapellery. The height of the foundations of the balcony and must coincide.
Balcony design
First step. Put on the finished base of wooden lags or reinforced concrete slabs.
The second step. With the help of a perforator, create an opening in the wall for mounting a balcony unit.
Third step. Install the balcony unit. After installation, align the slope with the cement mortar and close the existing slots using the mounting foam.
Fourth step. Build walls. For this convenient to use building blocks, for example, from foam concrete. They have a relatively low weight and will have a noticeably lower load on the foundation, compared with the same brick.
The wall thickness should be at least 25-30 cm. Move the walls to the upper overlap.
In the course of the construction of the walls every 3rd row, perform reinforcement.
Finally will still equip the roof. Roofing design must be made with a specific slope in the direction of the house.
To improve the roof, it is enough to lay wooden lags or mount a metal frame, and then the finishing roofing material is to be to wall.
Glazing balcony. After that, you will remain insulated and perform the finishing finish of the finished design. Recommendations for these events will be presented below.
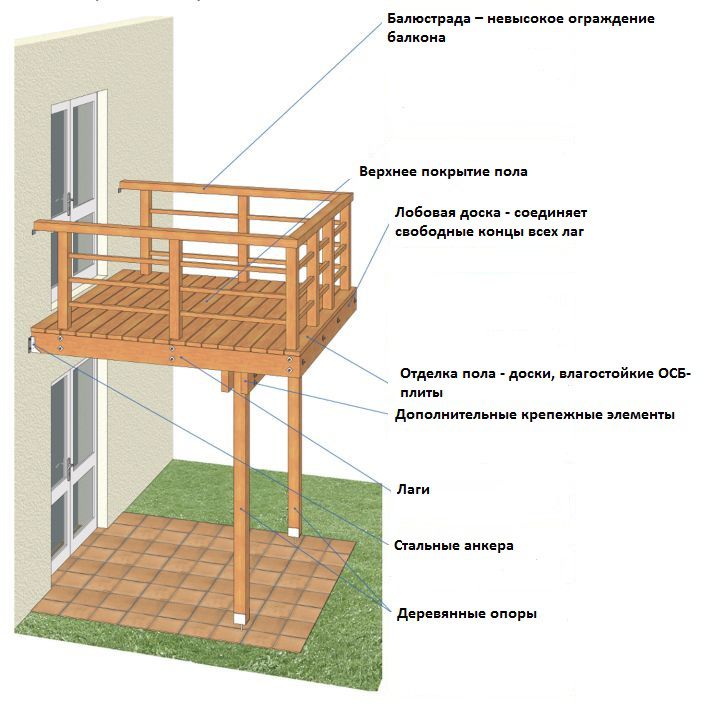
Building a remote balcony
This method allows you to build a balcony above the first floor.
Construction of the design begins with the arrangement of the frame.
First step
Attach the 5x15 cm bar to the bearing wall. Use anchors for fixation.
Second Step
Install the main carrying construction on the previously fixed bar. Bold it so that after installing the floor, its total height was 50-100 mm below the door threshold. This will eliminate the risk of atmospheric moisture into the room.
Third Step
On the opposite side, mount the longitudinal support element and set the transverse beams on it. The reference element is located on columns. At the same time, the level of its installation should be made with a minor bias (2-3 degrees will be enough) to ensure an effective disciplination of the house.
Scrollish
Perform additional frame strengthening with a ducts. In such a situation, the subscue function will take the inclined elements, leaving their lower edge into the support column or the carrier wall, and the upper part - in transverse beams.
Thanks to the tower, the stringency strife will be significantly increased.
In some situations, it is more convenient to use wooden triangles with a straight angle, made of thick and durable boards. At this moment, focus on the situation.
Installation of the balcony block
Supporting columns
The main support of the design under consideration is a tape-column foundation. Recommendations for its arrangement were previously brought.
With the functions of the support columns perfectly cope with a wooden ram of the square section. Parameters of timber pick individually. Most often enough supports with a side of 100 mm. Instead of a bar you can use another suitable material at your discretion.
Columns must be installed strictly vertically, otherwise the reliability of the balcony design will not be and speech. To ensure verticality, bring the columns by temporary pinks at the time of drying the foundation.
Floor
Put a stranded board with a thickness of 4 cm. Pre-process the material with an antiseptic and antipiren.
Boards Stay across the support beams. Leave a 2-3-millimeter gap between the boards to lead the precipitation.
Use screws for attaching boards. Fasteners heads need to be slightly dried into the material.
Perila
And the last structural element of the balcony is the railing. The choice of manufacturing material, features of the design and the appearance of the railing remains at the discretion of the owner. If desired, it is possible to do without them at all, making suitable fencing fencing from concrete slabs.
Glazing
Wooden frames or metal-plastic structures can be used for glazing. At this moment, everything also remains at the discretion of the owner.
Insulation balcony
Be sure to insulate a devounted balcony. Start from the floor.
Floor
For insulation of the floor, foam plates are well suited. The material is characterized by high thermal insulation properties and normally transfers different types of load.
Align the base and stick to it foam plates with the help of a specially intended binder. Provide additional fixation of the plates with plastic dowels.
On top of the insulation, put the mounting mesh on the glue, and then fill the entire design of the self-leveling mixture.
Instead, you can do on the basis of a wooden crate, fill it with emptiness with thermal insulation, and from above to fill the Fane or the board.
Linoleum is well suited as the finishing flooring for the balcony. You can also use waterproof laminate and other materials with similar properties.
Walls
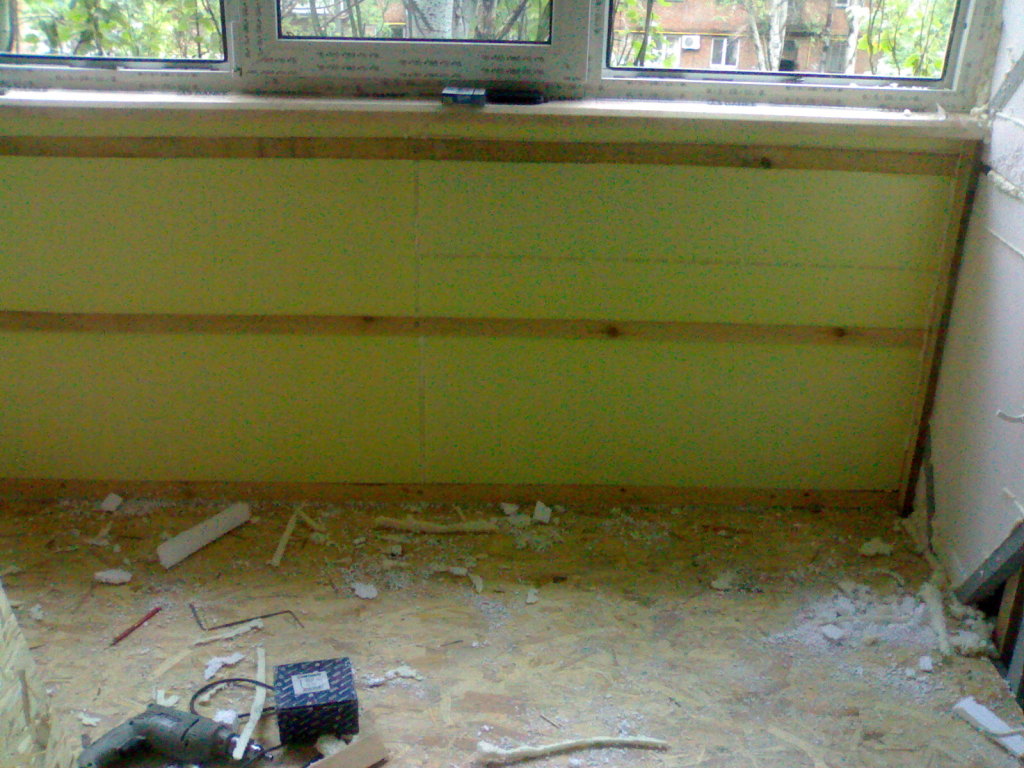
Wall insulation
Attach a frame of wooden plates to the walls. Deck fastening step Detect the width of the insulation.
Stip the frame with a waterproofing film. Use a construction stapler for fastening the film. The joints of the waterproofing material must definitely skatech.
Fill in the cells of the crates selected insulation. On top of the insulation, put a vapor barrier. Molding material also perform with the use of a construction stapler.
Up the first insulating cake, type the second crate perpendicular to the first, for mounting the finishing material.
Ceiling
Ceiling can be inspired by mineral wool.
Square to the ceiling the crate of boards having a 10-mm thickness. Boards fix the edge down.
Fill the gaps between the boards insulation.
Cover the insulation with waterproofing material and adjust additional transverse rails to the boards. They will hold heat and moisture insulation, as well as provide the necessary ventilation gap between the insulating cake and the finishing finishing material.
For interior trim, the balcony is well suited. The material has excellent properties and is fastened to the crate with the help of kleimers.
The exterior decoration of the structure is most often done using siding. This material is characterized by high reliability and excellent performance indicators, has an attractive appearance and is easily mounted without attracting third-party installers.
In general, when choosing an finishing finish, focus on your personal preferences and affordable budget.